Premiers pas
Vous avez donc maintenant une toute nouvelle installation de PaSSHport, mais vous ne savez pas quoi faire ensuite…
Exemple d'architecture
Pour ce tutoriel, nous utiliserons les informations suivantes :
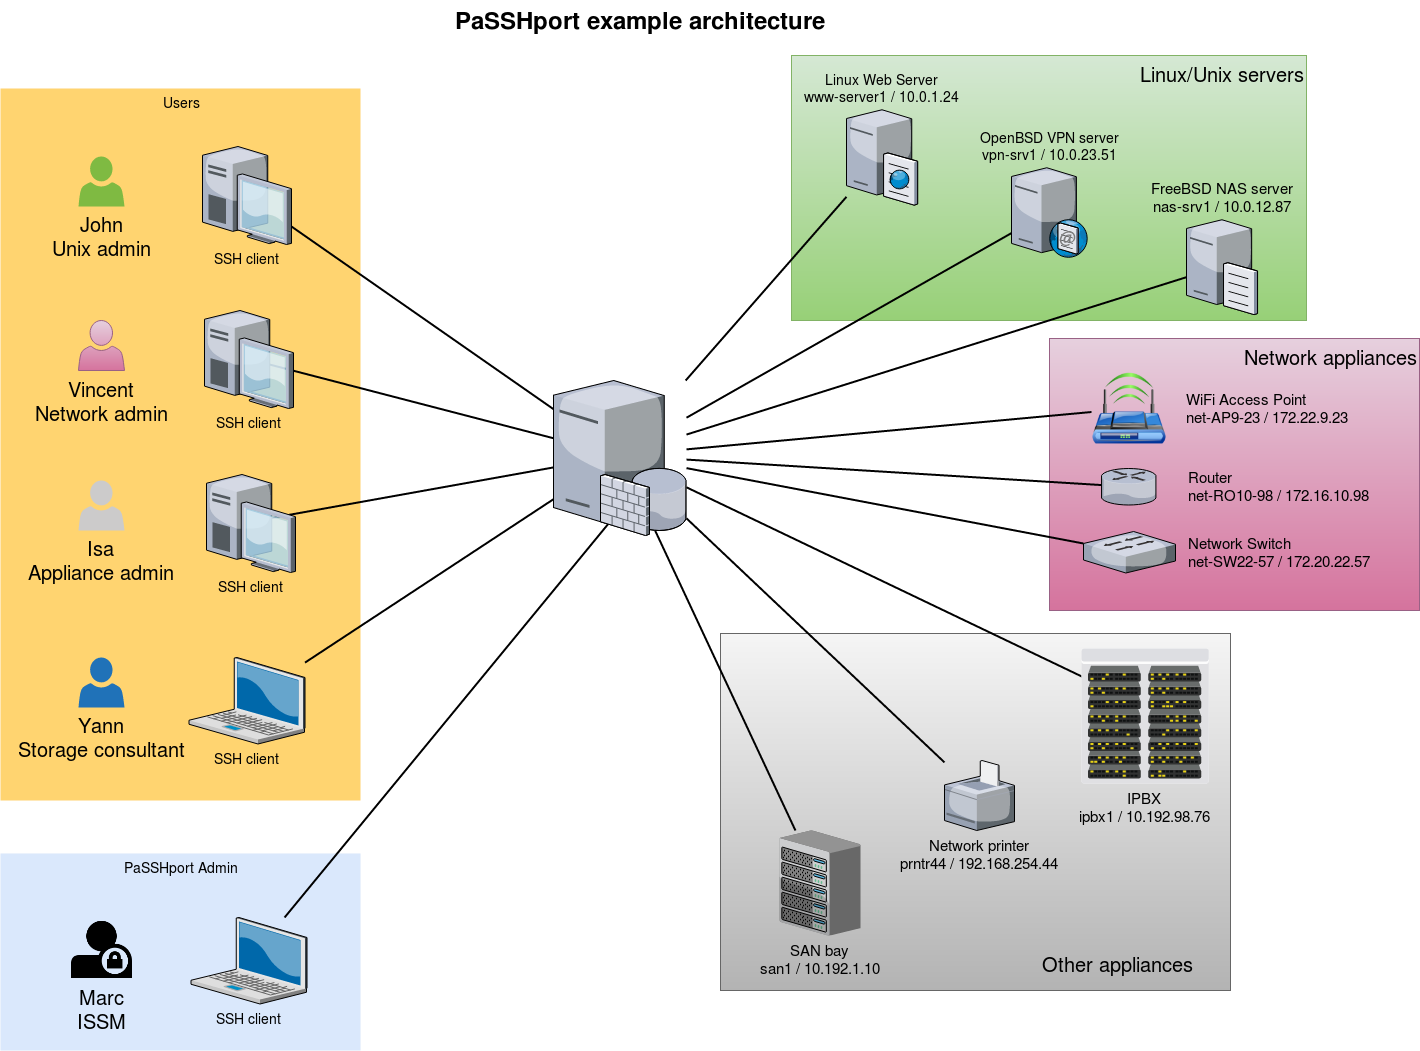
- 1 serveur PaSSHport
Nous utiliserons une installation monolithique de PaSSHport : passhportd, passhport et passhport-admin sont sur la même machine.
3 utilisateurs
- John, un administrateur linux/unix, qui doit accéder à l'ensemble des serveurs linux/unix
- Vincent, un administrateur réseau, qui a besoin d'accéder à tous les périphériques réseaux
- Alice, une administratrice généraliste, qui a besoin d'accéder à tous les périphériques tiers
- Yann, un consultant qui est ici pour une mission temporaire sur l'infrastructure de stockage, qui a besoin d'accéder au server NAS et à la bas SAN
1 administrateur PaSSHport
- Marc, le RSSI, qui configure PaSSHport, et qui contrôle les droits d'accès
3 type de targets (serveur cible)
- Serveurs Linux/Unix :
- 1 serveur web, Linux, www-server / 10.0.1.24
- 1 serveur VPN, OpenBSD, vpn-srv1 / 10.0.23.51
- 1 serveur NAS, FreeBSD, nas-srv1 / 10.0.12.87
- Périphérique réseau
- 1 point d'accès WiFi, net-AP9-23 / 172.22.9.23
- 1 routeur, net-RO10-98 / 172.16.10.98
- 1 commutateur réseau (switch), net-SW22-57 / 172.20.22.57
- Autre périphériques
- 1 IPBX (serveur voix sur IP), ipbx1 / 10.192.98.76
- 1 imprimante réseau, prntr44 / 192.168.254.44
- 1 bay SAN, san1 / 10.192.1.10
Configurer les targets
Tout d'abord, nous allons enregistrer les targets dans PaSSHport
On se connecte au serveur PaSSHport, et on ajout le serveur linux. On peut le faire en tant qu'utilisateur passhport :
passhport@passhport-server:~$ passhport-admin target create www-server 10.0.1.24
OK: "www-server" -> created
passhport@passhport-server:~$
On peut vérifier que la target a été correctement enregistrée :
passhport@passhport-server:~$ passhport-admin target list
www-server
passhport@passhport-server:~$
Maintenant, ajoutons les autres serveurs Linux/Unix :
passhport@passhport-server:~$ passhport-admin target create vpn-srv1 10.0.23.51
OK: "vpn-srv1" -> created
passhport@passhport-server:~$ passhport-admin target create nas-srv1 10.0.23.51
OK: "nas-srv1" -> created
passhport@passhport-server:~$
On fait la même chose avec les périphériques réseaux, et les autres :
passhport@passhport-server:~$ passhport-admin target create net-AP9-23 172.22.9.23
OK: "net-AP9-23" -> created
passhport@passhport-server:~$ passhport-admin target create net-RO10-98 172.16.10.98
OK: "net-RO10-98" -> created
passhport@passhport-server:~$ passhport-admin target create net-SW22-57 172.20.22.57
OK: "net-SW22-57" -> created
passhport@passhport-server:~$ passhport-admin target create ipbx1 10.192.98.76
OK: "ipbx1" -> created
passhport@passhport-server:~$ passhport-admin target create prntr44 192.168.254.44
OK: "prntr44" -> created
passhport@passhport-server:~$ passhport-admin target create san1 10.192.1.10
OK: "san1" -> created
passhport@passhport-server:~$
Nous avons désormais l'ensemble de nos targets configurées dans PaSSHport.
Target avec un login spécifique
Nous voulons être capable de nous connecter à la baie SAN, en tant un autre utilisateur que root, car Yann (le prestataire) ne doit accéder à cette baie en tant que root, mais en tant qu'utilisateur "admin" :
root@passhport-server:~# passhport-admin target create
Name: admin@san1
Hostname: 10.192.1.10
Login (default is root): admin
Port: 22
SSH Options:
Comment: SAN bay, login as admin user, not root.
OK: "admin@san1" -> created
root@passhport-server:~#
La baie SAN sera désormais accessible à travers deux targets : "san1" et "admin@san1".
Configuration des groupes de targets (targetgroup)
Nous groupons les targets que nous venons de créer dans trois groupes : unices, network, et autres.
Nous créons les groupes :
passhport@passhport-server:~$ passhport-admin targetgroup create unices
OK: "unices" -> created
passhport@passhport-server:~$ passhport-admin targetgroup create network
OK: "network" -> created
passhport@passhport-server:~$ passhport-admin targetgroup create others
OK: "others" -> created
passhport@passhport-server:~$
Maintenant nous mettons les targets dans les groupes correspondant :
passhport@passhport-server:~$ passhport-admin targetgroup addtarget www-server unices
OK: "www-server" added to "unices"
passhport@passhport-server:~$
Je suis paresseux, je vais donc "scripter" un peu tout ça :
passhport@passhport-server:~$ for UNICE in vpn-srv1 nas-srv1; do passhport-admin targetgroup addtarget ${UNICE} unices; done
OK: "vpn-srv1" added to "unices"
OK: "nas-srv1" added to "unices"
passhport@passhport-server:~$ for NETAPPLIANCE in net-AP9-23 net-RO10-98 net-SW22-57; do passhport-admin targetgroup addtarget ${NETAPPLIANCE} network; done
OK: "net-AP9-23" added to "network"
OK: "net-RO10-98" added to "network"
OK: "net-SW22-57" added to "network"
passhport@passhport-server:~$ for OTHERAPPLIANCE in ipbx1 prntr44 san1; do passhport-admin targetgroup addtarget ${OTHERAPPLIANCE} others; done
OK: "ipbx1" added to "others"
OK: "prntr44" added to "others"
OK: "san1" added to "others"
passhport@passhport-server:~$
Nous créons un dernier groupe, qui contiendra l'ensemble des targets (je vais encore le scripter) :
passhport@passhport-server:~$ passhport-admin targetgroup create all-targets
OK: "all-targets" -> created
passhport@passhport-server:~$ for TARGET in `passhport-admin target list`; do passhport-admin targetgroup addtarget ${TARGET} all-targets; done
OK: "ipbx1" added to "all-targets"
OK: "nas-srv1" added to "all-targets"
OK: "net-AP9-23" added to "all-targets"
OK: "net-RO10-98" added to "all-targets"
OK: "net-SW22-57" added to "all-targets"
OK: "prntr44" added to "all-targets"
OK: "san1" added to "all-targets"
OK: "vpn-srv1" added to "all-targets"
OK: "www-server" added to "all-targets"
passhport@passhport-server:~$
On en a terminé avec les targets et les targetgroups (au moins pour le moment)…
Configuration des utilisateurs
Nous partons du préalable que nos utilisateurs on déjà crée leur clé publique SSH (rsa, dsa ou ecdsa), et qu'il nous on donné leur clé publique. Nous avons les clés suivantes :
Alice, une clé RSA de 2048 bits :
ssh-rsa AAAAB3NzaC1yc2EAAAADAQABAAABAQC8JMsMgyRUEMoq31rPTIWpWKgGFQ7fxt5Kray8yzCPga2pohMLstjJeHpWjkVhH8FhRUwCFXOM8zBEykz1IVFjowzFqR9kPvV0fELuIeK/V/42j3izeRH5liXFwotxzfpqTijTxAfj/60IadcUSf5dE8WAiREarrV82ieU5eNZ4FoCH4W0xPS8pEYJDv6hQ8TFHYQCrwHloA3HgzEJgQSFWaS3niMDfNbgbJEOVhXuT2l7pWgSnp1l5jewAq5CB71mMiUyF+zG8FRAYqUKd4VNRN+3/tp+9FEAqGCH3kTuFhFnWCgguQxDxH4XiIj7n2w79ARPzMbn2vTtd+6N0or7 alice@myfirm.com
John, une clé ECDSA de 521 bits :
ecdsa-sha2-nistp521 AAAAE2VjZHNhLXNoYTItbmlzdHA1MjEAAAAIbmlzdHA1MjEAAACFBAHTlnhl23T9NiHn06wWaDpT1aJqEY0aOW7E4dfu7kQJsmRqg2SWMld6H8Q+bggwCLSkRKubOWyoJkprAfwOP8OArAGPCIr9PeQfC581EVqaev/yJYbKwwPQEaHpiQoHMaBfsgA2BYS5cNVcrOpLk8nHgKSJGEcdYipbZZxqDrLaeX3lBA== john@myfirm.com
Marc, une clé RSA de 4096 bits :
ssh-rsa AAAAB3NzaC1yc2EAAAADAQABAAACAQDFOU5Saf+epkm79BeSniE7VtYMexJeL6BvXUsKUb7m8W4gnD3YTBW93uykO/6ovi9TfYdm+4nKQ9gUGUgzNyD8o7zW8w6wKogoL24UbJKmkZOCU1IgHJSt1QYIs/qHQZ2MR6S6K2f/1J1joYINPtGpQJ475OZfYQbP79fEdRdylupC8L+fvxkka4C0Uxj0I1VjDCVJCjO0md5oXzN75I2aw+RFWuiiL5P/gHRu+2iff2rdhebJZs4ux8u76LQLzYsG9a85Xlagw6N7/aXWnUZ/9gqoF/qVUHfS8ggesTwEJyNnY7EpPcKRUcwnlonn5CIS++Yo8iqjLd93RjFxShUqXlw9Cct4hdh/clW/QYsJRMfN9860mZ9v9dEitM2X1w8HCCD5NAHGqRRrtONM99kZRxmkCQ/Tb+jXvJ+VAl4qffuPPdxY+Bev7wygm4rVnjF2Ac5ioWb4Zd+zIb712VTQDQlRxsu73yWtHSodeSgPpgCWTjCwW/841QbPGkclnE6DKIwQ/vxC0ggSXouc5G6j0gHu90eQ24XL6Gurqr2C11w9saRyzrYRRlS0Ihkp3rMSteVcvrb1Qi4UGmJCHHSBhvP8jRFH4mbdkSGyzsxtjr8puJc8DiQ1UKG3O9X12m8nbOYeNdIofTw615k0YitoQ/60fdEELQyX+kNFQ2VoCw== marc@myfirm.com
Vincent, une clé ECDSA de 521 bits :
ecdsa-sha2-nistp521 AAAAE2VjZHNhLXNoYTItbmlzdHA1MjEAAAAIbmlzdHA1MjEAAACFBAHJk+qDLEi283+rUmSek3eEF4PqXYMmQlPTj352w0XO75EGJzfavEDFe0h+Bu39XN/xVc+ypwOb2vv6pcjVsvuHTwHgXR2ElyfE8gGV7mITyXMdDyoWP5N8Ly3s7njNChSL9z3NiG38lg3E4Vg10nbmmoZZCA3WCffV4ugp3lYPnFmtfA== vincent@myfirm.com
Et Yann, une clé RSA de 2048 bits :
ssh-rsa AAAAB3NzaC1yc2EAAAADAQABAAABAQCs9YpOfP9vgViYa1SSntrydEBLGyWGAr9nvEjqHcMwHQb9JEmhIjvk1ctb8+Kns3/52F0hBrxic6k6UPvvvjbtJX33muFv5dd0k1W4lLcYe4ONTFwLOqCph4Is5r9lbZ5KXxhN/8YC/08jBJow0CoYdc+Yr7MlA51+tEQFwPbuB5vHMUteye0IgmaH9MLzXes/j5BUhnBjDscWVQSvNHY4/PKtHvIdvoI1uKAplstuHI6CDqnb0aJ5P9wME3P1lhRwcVDTm48/AMcfmpp5s+DwOmyDGfGXf+hE0cu7ulAkwHBhR6ciJJg1pz4DqraglxyVyrt+PFq6KDeV/7WwoNEP yann@otherfirm.com
Avec ces clés, nous pouvons ajouter les utilisateurs, des manières suivantes…
- De manière interactive :
passhport@passhport-server:~$ passhport-admin user create
Email (user name): alice@myfirm.com
SSH Key: ssh-rsa AAAAB3NzaC1yc2EAAAADAQABAAABAQC8JMsMgyRUEMoq31rPTIWpWKgGFQ7fxt5Kray8yzCPga2pohMLstjJeHpWjkVhH8FhRUwCFXOM8zBEykz1IVFjowzFqR9kPvV0fELuIeK/V/42j3izeRH5liXFwotxzfpqTijTxAfj/60IadcUSf5dE8WAiREarrV82ieU5eNZ4FoCH4W0xPS8pEYJDv6hQ8TFHYQCrwHloA3HgzEJgQSFWaS3niMDfNbgbJEOVhXuT2l7pWgSnp1l5jewAq5CB71mMiUyF+zG8FRAYqUKd4VNRN+3/tp+9FEAqGCH3kTuFhFnWCgguQxDxH4XiIj7n2w79ARPzMbn2vTtd+6N0or7 alice@myfirm.com
Comment: Alice is the general applicance admin
OK: "alice@myfirm.com" -> created
passhport@passhport-server:~$
- Sur une seule ligne, en un coup :
passhport@passhport-server:~$ passhport-admin user create john@myfirm.com "ecdsa-sha2-nistp521 AAAAE2VjZHNhLXNoYTItbmlzdHA1MjEAAAAIbmlzdHA1MjEAAACFBAHTlnhl23T9NiHn06wWaDpT1aJqEY0aOW7E4dfu7kQJsmRqg2SWMld6H8Q+bggwCLSkRKubOWyoJkprAfwOP8OArAGPCIr9PeQfC581EVqaev/yJYbKwwPQEaHpiQoHMaBfsgA2BYS5cNVcrOpLk8nHgKSJGEcdYipbZZxqDrLaeX3lBA== john@myfirm.com" --comment="John is the Unices admin. He rocks."
OK: "john@myfirm.com" -> created
passhport@passhport-server:~$
Nous ajoutons les autres :
passhport@passhport-server:~$ passhport-admin user create marc@myfirm.com "ssh-rsa AAAAB3NzaC1yc2EAAAADAQABAAACAQDFOU5Saf+epkm79BeSniE7VtYMexJeL6BvXUsKUb7m8W4gnD3YTBW93uykO/6ovi9TfYdm+4nKQ9gUGUgzNyD8o7zW8w6wKogoL24UbJKmkZOCU1IgHJSt1QYIs/qHQZ2MR6S6K2f/1J1joYINPtGpQJ475OZfYQbP79fEdRdylupC8L+fvxkka4C0Uxj0I1VjDCVJCjO0md5oXzN75I2aw+RFWuiiL5P/gHRu+2iff2rdhebJZs4ux8u76LQLzYsG9a85Xlagw6N7/aXWnUZ/9gqoF/qVUHfS8ggesTwEJyNnY7EpPcKRUcwnlonn5CIS++Yo8iqjLd93RjFxShUqXlw9Cct4hdh/clW/QYsJRMfN9860mZ9v9dEitM2X1w8HCCD5NAHGqRRrtONM99kZRxmkCQ/Tb+jXvJ+VAl4qffuPPdxY+Bev7wygm4rVnjF2Ac5ioWb4Zd+zIb712VTQDQlRxsu73yWtHSodeSgPpgCWTjCwW/841QbPGkclnE6DKIwQ/vxC0ggSXouc5G6j0gHu90eQ24XL6Gurqr2C11w9saRyzrYRRlS0Ihkp3rMSteVcvrb1Qi4UGmJCHHSBhvP8jRFH4mbdkSGyzsxtjr8puJc8DiQ1UKG3O9X12m8nbOYeNdIofTw615k0YitoQ/60fdEELQyX+kNFQ2VoCw== marc@myfirm.com"
OK: "marc@myfirm.com" -> created
passhport@passhport-server:~$ passhport-admin user create vincent@myfirm.com "ecdsa-sha2-nistp521 AAAAE2VjZHNhLXNoYTItbmlzdHA1MjEAAAAIbmlzdHA1MjEAAACFBAHJk+qDLEi283+rUmSek3eEF4PqXYMmQlPTj352w0XO75EGJzfavEDFe0h+Bu39XN/xVc+ypwOb2vv6pcjVsvuHTwHgXR2ElyfE8gGV7mITyXMdDyoWP5N8Ly3s7njNChSL9z3NiG38lg3E4Vg10nbmmoZZCA3WCffV4ugp3lYPnFmtfA== vincent@myfirm.com" --comment="Vincent is the network admin."
OK: "vincent@myfirm.com" -> created
passhport@passhport-server:~$ passhport-admin user create yann@otherfirm.com "ssh-rsa AAAAB3NzaC1yc2EAAAADAQABAAABAQCs9YpOfP9vgViYa1SSntrydEBLGyWGAr9nvEjqHcMwHQb9JEmhIjvk1ctb8+Kns3/52F0hBrxic6k6UPvvvjbtJX33muFv5dd0k1W4lLcYe4ONTFwLOqCph4Is5r9lbZ5KXxhN/8YC/08jBJow0CoYdc+Yr7MlA51+tEQFwPbuB5vHMUteye0IgmaH9MLzXes/j5BUhnBjDscWVQSvNHY4/PKtHvIdvoI1uKAplstuHI6CDqnb0aJ5P9wME3P1lhRwcVDTm48/AMcfmpp5s+DwOmyDGfGXf+hE0cu7ulAkwHBhR6ciJJg1pz4DqraglxyVyrt+PFq6KDeV/7WwoNEP yann@otherfirm.com" --comment="Yann is an external consultant, for a temporary mission bout storage infrastructure."
OK: "yann@otherfirm.com" -> created
passhport@passhport-server:~$
Comme vous pouvez le voir ci-dessus, nous avons oublié de mettre un commentaire pour l'utilisateur "marc@myfirm.com". Ajoutons-en un :
passhport@passhport-server:~$ passhport-admin user edit marc@myfirm.com --newcomment="Marc is the ISSM. He access all."
OK: "marc@myfirm.com" -> edited
passhport@passhport-server:~$
Les utilisateurs sont maintenant créer. Mettons les dans des groupes d'utilisateur (usergroup)…
Configuration des usergroups
Même si dans ce tutoriel, nous n'avons qu'un utilisateur pour chaque type de machine à administrer, il est généralement conseillé de créer un groupe pour chaque type de compétence.
Ajoutons ces groupes :
passhport@passhport-server:~# passhport-admin usergroup create unices_admins
OK: "unices_admins" -> created
passhport@passhport-server:~# passhport-admin usergroup create network_admins
OK: "network_admins" -> created
passhport@passhport-server:~# passhport-admin usergroup create appliance_admins
OK: "appliance_admins" -> created
passhport@passhport-server:~# passhport-admin usergroup create super_admins
OK: "super_admins" -> created
passhport@passhport-server:~#
Nous ajoutons chaque utilisateur au groupe lui correspondant :
passhport@passhport-server:~$ passhport-admin usergroup adduser john@myfirm.com unices_admins
OK: "john@myfirm.com" added to "unices_admins"
passhport@passhport-server:~$ passhport-admin usergroup adduser vincent@myfirm.com network_admins
OK: "vincent@myfirm.com" added to "network_admins"
passhport@passhport-server:~$ passhport-admin usergroup adduser alice@myfirm.com appliance_admins
OK: "alice@myfirm.com" added to "appliance_admins"
passhport@passhport-server:~$ passhport-admin usergroup adduser marc@myfirm.com super_admins
OK: "marc@myfirm.com" added to "super_admins"
passhport@passhport-server:~$
Mise en ralation des groupe
Nous pouvons maintenant connecter chaque usergroup à son targetgroup :
passhport@passhport-server:~# passhport-admin targetgroup addusergroup unices_admins unices
OK: "unices_admins" added to "unices"
passhport@passhport-server:~# passhport-admin targetgroup addusergroup network_admins network
OK: "network_admins" added to "network"
passhport@passhport-server:~# passhport-admin targetgroup addusergroup appliance_admins others
OK: "appliance_admins" added to "others"
passhport@passhport-server:~# passhport-admin targetgroup addusergroup super_admins all-targets
OK: "super_admins" added to "all-targets"
passhport@passhport-server:~#
Configuration spécifique pour le prestataire Yann :
Comme Yann n'est ici que pour une courte mission, et qu'il a besoin d'accéder à différentes targets qui n'ont pas vocations à être groupée au sein d'un targetgroup, nous connectons directement l'utilisateur à ses targets :
passhport@passhport-server:~$ passhport-admin target adduser yann@otherfirm.com nas-srv1
OK: "yann@otherfirm.com" added to "nas-srv1"
passhport@passhport-server:~# passhport-admin target adduser yann@otherfirm.com admin@san1
OK: "yann@otherfirm.com" added to "admin@san1"
passhport@passhport-server:~#
Comme vous pouvez le voir ci-dessus, nous n'avons pas donné à Yann l'accès a la baie SAN san1 en tant que root, mais en tant qu'utilisateur admin, grâce à la target admin@san1 précédemment configurée.
Vérification des droits d'accès :
On peut vérifier ce que nous avons configuré avec la sous-commande "show" de passhport-admin :
passhport@passhport-server:~$ passhport-admin user show marc@myfirm.com
Email: marc@myfirm.com
SSH key: ssh-rsa AAAAB3NzaC1yc2EAAAADAQABAAACAQDFOU5Saf+epkm79BeSniE7VtYMexJeL6BvXUsKUb7m8W4gnD3YTBW93uykO/6ovi9TfYdm+4nKQ9gUGUgzNyD8o7zW8w6wKogoL24UbJKmkZOCU1IgHJSt1QYIs/qHQZ2MR6S6K2f/1J1joYINPtGpQJ475OZfYQbP79fEdRdylupC8L+fvxkka4C0Uxj0I1VjDCVJCjO0md5oXzN75I2aw+RFWuiiL5P/gHRu+2iff2rdhebJZs4ux8u76LQLzYsG9a85Xlagw6N7/aXWnUZ/9gqoF/qVUHfS8ggesTwEJyNnY7EpPcKRUcwnlonn5CIS++Yo8iqjLd93RjFxShUqXlw9Cct4hdh/clW/QYsJRMfN9860mZ9v9dEitM2X1w8HCCD5NAHGqRRrtONM99kZRxmkCQ/Tb+jXvJ+VAl4qffuPPdxY+Bev7wygm4rVnjF2Ac5ioWb4Zd+zIb712VTQDQlRxsu73yWtHSodeSgPpgCWTjCwW/841QbPGkclnE6DKIwQ/vxC0ggSXouc5G6j0gHu90eQ24XL6Gurqr2C11w9saRyzrYRRlS0Ihkp3rMSteVcvrb1Qi4UGmJCHHSBhvP8jRFH4mbdkSGyzsxtjr8puJc8DiQ1UKG3O9X12m8nbOYeNdIofTw615k0YitoQ/60fdEELQyX+kNFQ2VoCw== marc@myfirm.com
Comment: Marc is the ISSM. He access all.
Accessible target list: ipbx1 nas-srv1 net-AP9-23 net-RO10-98 net-SW22-57 prntr44 san1 vpn-srv1 www-server

Details in access:
Accessible directly:
Accessible through usergroups:
super_admins: www-server ; vpn-srv1 ; nas-srv1 ; net-AP9-23 ; net-RO10-98 ; net-SW22-57 ; ipbx1 ; prntr44 ; san1 ;
Accessible through targetgroups:
passhport@passhport-server:~$
Comme on peut le voir, la sous commande "show" montre comment un utilisateur à accès à une target. Nous pouvons voir ci-dessus que Marc a accès à toutes targets configurées, parce que nous l'avons placé dans le usergroup "super_admins".
Voici l'exemple de Yann :
passhport@passhport-server:~$ passhport-admin user show yann@otherfirm.com
Email: yann@otherfirm.com
SSH key: ssh-rsa AAAAB3NzaC1yc2EAAAADAQABAAABAQCs9YpOfP9vgViYa1SSntrydEBLGyWGAr9nvEjqHcMwHQb9JEmhIjvk1ctb8+Kns3/52F0hBrxic6k6UPvvvjbtJX33muFv5dd0k1W4lLcYe4ONTFwLOqCph4Is5r9lbZ5KXxhN/8YC/08jBJow0CoYdc+Yr7MlA51+tEQFwPbuB5vHMUteye0IgmaH9MLzXes/j5BUhnBjDscWVQSvNHY4/PKtHvIdvoI1uKAplstuHI6CDqnb0aJ5P9wME3P1lhRwcVDTm48/AMcfmpp5s+DwOmyDGfGXf+hE0cu7ulAkwHBhR6ciJJg1pz4DqraglxyVyrt+PFq6KDeV/7WwoNEP yann@otherfirm.com
Comment: Yann is an external consultant, for a temporary mission bout storage infrastructure.
Accessible target list: nas-srv1 san1

Details in access:
Accessible directly: nas-srv1 ; san1 ;
Accessible through usergroups:
Accessible through targetgroups:
passhport@passhport-server:~$
On peut voir ci-dessus que Yann à un accès direct aux target, sans passer par des usergroup, ou des targetgroup.
Connectons-nous !
Mettons nous maintenant dans la peau de John : je me connect à PaSSHport, en utilisant la clé id_ecdsa que j'ai envoyé à l'administrateur de PaSSHport :
john@my-desktop:~$ ssh passhport@passhport-server
Welcome john@myfirm.com.
Here is the list of servers you can access:
1  www-server  10.0.1.24
2  vpn-srv1    10.0.23.51
3  nas-srv1    10.0.12.87
Type the number, name or hostname of the server you want to connect to :
En tant que John, je constate que je peux accéder à trois serveurs : www-server, vpn-srv1, et nas-srv1. Je peux maintenant accéder à chacun de ces serveurs, selon les méthodes suivantes :
- Le numéro situé dans la première colonne;
- le nom du serveur (www-server…);
- l'adresse IP.
john@my-desktop:~$ ssh passhport@passhport-server
Welcome john@myfirm.com.
Here is the list of servers you can access:
1  www-server  10.0.1.24
2  vpn-srv1    10.0.23.51
3  nas-srv1    10.0.12.87
Type the number, name or hostname of the server you want to connect to : 1
Linux www-server 4.9.0-3-amd64 #1 SMP Debian 4.9.30-2+deb9u3 (2017-08-06) x86_64
root@www-server:~#
John est maintenant sur le serveur www-server.
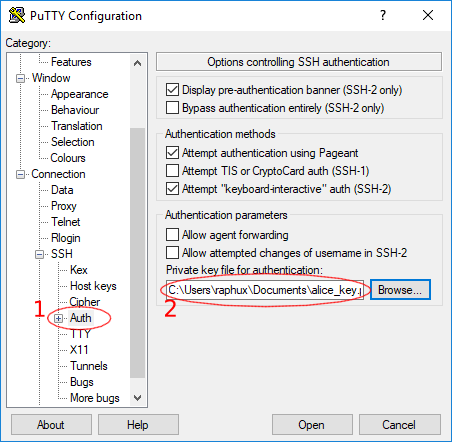
Je suis maintenant dans la peau d'Alice, dont le poste de travail est sous Windows. Je vais utiliser l'outil Putty pour me connecter à PaSSHport. Voilà comment le configurer :
On lance Putty (téléchargable ici), et sur la partie gauche, on clique sur Connection -> SSH -> Auth, pour selectionner la clé PPK qu'Alice a créé (avec l'outil puttygen par exemple) :
Ensuite nous allons dans Connection -> SSH -> Data , et mettons le username à passhport :

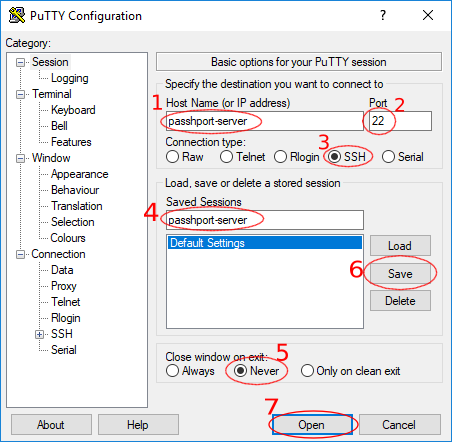
Pour finir, on retourne à la racine de l'arbre de configuration, dans la section Session :
- on entre le nom d'hôte ou l'IP du serveur PaSSHport
- on entre le port du serveur SSH (généralement 22)
- on sélectionne SSH comme type de connexion
- on entre le nom sous lequel sauver la configuration que nous venons de mettre en place
Pour débugger une connexion défaillante, il est souvent utile de sélectionner l'option Never dans la section Close window on exit, et ce, afin de voir la raison de déconnexion.
On sauve, et on clique le bouton Open, pour lancer la connexion !
Si c'est la première fois qu'on se connecte sur le serveur PaSSHport, une fenêtre indiquant qu'il faut vérifier l'empreinte du serveur, et si on doit l'accepter… On l'accepte en cliquant le bouton Oui :

Nous avons ensuite le prompt de PaSSHport, et comme nous voulons nous connecter à l'IPBX, on sélection l'entrée 1 :
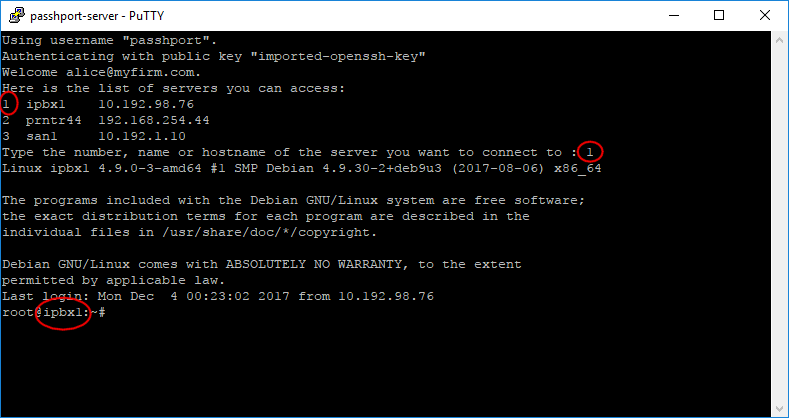
On est désormais sur notre serveur cible.
Dernier exemple intéressant, Yann, qui accède au serveur nas-srv1 et san1. Il utilise un ordinateur portable sous linux :
yann@my-laptop:~$ ssh passhport@passhport-server
Welcome yann@otherfirm.com.
Here is the list of servers you can access:
1  nas-srv1    10.0.12.87
2  admin@san1  10.192.1.10  SAN bay, login as admin user, not root.
Type the number, name or hostname of the server you want to connect to :
Il peut désormais accéder au deux serveurs relatifs à sa mission.
Suppression d'un utilisateur
Yann a désormais fini sa mission, et a quitté la société. On peut révoquer ses droits de deux manières :
- en enlevant les liaisons de son compte (que ce soit une target, un targetgroup, ou un usergroup) ;
- en supprimant l'utilisateur.
Il parfois plus judicieux d'utiliser la première méthode, quand on sait par exemple que l'utilisateur est susceptible de revenir plus tard, et ne pas avoir à le recréer (et devoir récupérer sa clef, et ses informations…). Voici comment procéder :
Premièrement, on liste ses droits :
passhport@passhport-server:~$ passhport-admin user show yann@otherfirm.com
Email: yann@otherfirm.com
SSH key: ssh-rsa AAAAB3NzaC1yc2EAAAADAQABAAABAQCs9YpOfP9vgViYa1SSntrydEBLGyWGAr9nvEjqHcMwHQb9JEmhIjvk1ctb8+Kns3/52F0hBrxic6k6UPvvvjbtJX33muFv5dd0k1W4lLcYe4ONTFwLOqCph4Is5r9lbZ5KXxhN/8YC/08jBJow0CoYdc+Yr7MlA51+tEQFwPbuB5vHMUteye0IgmaH9MLzXes/j5BUhnBjDscWVQSvNHY4/PKtHvIdvoI1uKAplstuHI6CDqnb0aJ5P9wME3P1lhRwcVDTm48/AMcfmpp5s+DwOmyDGfGXf+hE0cu7ulAkwHBhR6ciJJg1pz4DqraglxyVyrt+PFq6KDeV/7WwoNEP yann@otherfirm.com
Comment: Yann is an external consultant, for a temporary mission bout storage infrastructure.
Accessible target list: admin@san1 nas-srv1

Details in access:
Accessible directly: nas-srv1 ; admin@san1 ;
Accessible through usergroups:
Accessible through targetgroups:
passhport@passhport-server:~$
On peut voir qu'il a accès aux targets nas-srv1 et admin@san1, directement. Révoquons ces droits :
passhport@passhport-server:~$ passhport-admin target rmuser yann@otherfirm.com admin@san1
OK: "yann@otherfirm.com" removed from "admin@san1"
passhport@passhport-server:~$ passhport-admin target rmuser yann@otherfirm.com nas-srv1
OK: "yann@otherfirm.com" removed from "nas-srv1"
passhport@passhport-server:~$
Yann n'aura désormais plus accès à ces targets :
passhport@passhport-server:~$ passhport-admin user show yann@otherfirm.com
Email: yann@otherfirm.com
SSH key: ssh-rsa AAAAB3NzaC1yc2EAAAADAQABAAABAQCs9YpOfP9vgViYa1SSntrydEBLGyWGAr9nvEjqHcMwHQb9JEmhIjvk1ctb8+Kns3/52F0hBrxic6k6UPvvvjbtJX33muFv5dd0k1W4lLcYe4ONTFwLOqCph4Is5r9lbZ5KXxhN/8YC/08jBJow0CoYdc+Yr7MlA51+tEQFwPbuB5vHMUteye0IgmaH9MLzXes/j5BUhnBjDscWVQSvNHY4/PKtHvIdvoI1uKAplstuHI6CDqnb0aJ5P9wME3P1lhRwcVDTm48/AMcfmpp5s+DwOmyDGfGXf+hE0cu7ulAkwHBhR6ciJJg1pz4DqraglxyVyrt+PFq6KDeV/7WwoNEP yann@otherfirm.com
Comment: Yann is an external consultant, for a temporary mission bout storage infrastructure.
Accessible target list:

Details in access:
Accessible directly:
Accessible through usergroups:
Accessible through targetgroups:
passhport@passhport-server:~$
La seconde option est de supprimer cet utilisateur :
passhport@passhport-server:~$ passhport-admin user delete yann@otherfirm.com
Email: yann@otherfirm.com
SSH key: ssh-rsa AAAAB3NzaC1yc2EAAAADAQABAAABAQCs9YpOfP9vgViYa1SSntrydEBLGyWGAr9nvEjqHcMwHQb9JEmhIjvk1ctb8+Kns3/52F0hBrxic6k6UPvvvjbtJX33muFv5dd0k1W4lLcYe4ONTFwLOqCph4Is5r9lbZ5KXxhN/8YC/08jBJow0CoYdc+Yr7MlA51+tEQFwPbuB5vHMUteye0IgmaH9MLzXes/j5BUhnBjDscWVQSvNHY4/PKtHvIdvoI1uKAplstuHI6CDqnb0aJ5P9wME3P1lhRwcVDTm48/AMcfmpp5s+DwOmyDGfGXf+hE0cu7ulAkwHBhR6ciJJg1pz4DqraglxyVyrt+PFq6KDeV/7WwoNEP yann@otherfirm.com
Comment: Yann is an external consultant, for a temporary mission bout storage infrastructure.
Accessible target list:

Details in access:
Accessible directly:
Accessible through usergroups:
Accessible through targetgroups:
Are you sure you want to delete yann@otherfirm.com? [y/N] y
OK: "yann@otherfirm.com" -> deleted
passhport@passhport-server:~$
Conclusion
Vous devriez être désormais capable d'utiliser les fonctions basiques de PaSSHport.